
Vrikshasana: Benefits, Steps, Meaning & Precautions
Vrikshasana, or Tree Pose, is a standing balancing asana within the wider practice of Yoga Asanas, in which one foot remains firmly grounded while the other is placed against the standing leg. At first, the posture may seem to be simply a test of balance. With practice, however, it teaches something subtler: how to remain steady while the body is constantly making small adjustments.
Think of a tree. Its roots provide stability, its trunk rises upward, and its branches reach outward. It does not become rigid in order to stand; it remains rooted while responding to movement around it. Vrikshasana invites us to explore a similar quality in our own practice.
For the student, the aim is not to force the lifted foot higher or remain perfectly motionless. Instead, establish a stable foundation, breathe naturally, keep the mind attentive, and allow the posture to develop gradually.
In this article, we will explore the meaning and traditional background of Vrikshasana, how to practise it, common mistakes and beginner modifications, its practical and yogic benefits, and the precautions worth understanding before you begin.
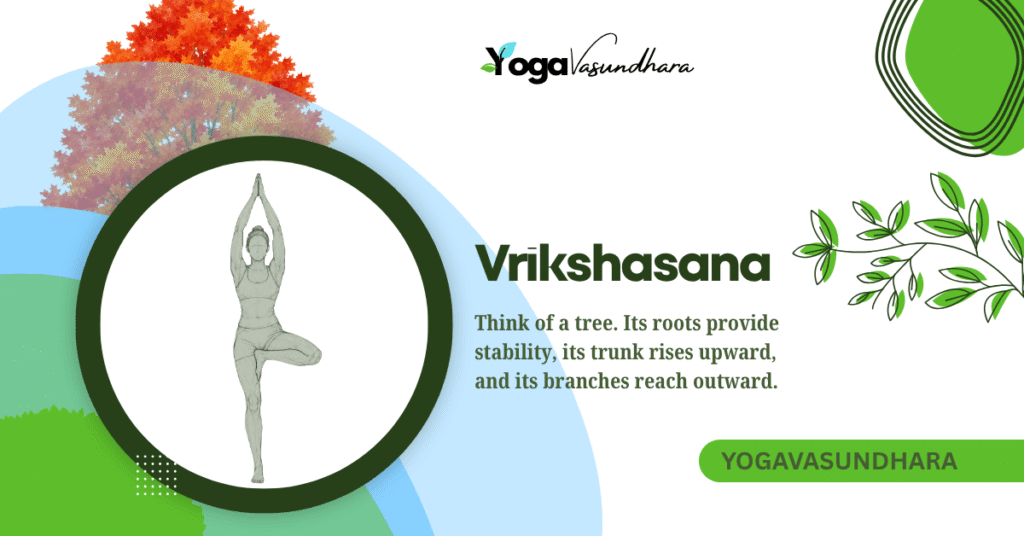
What Is Vrikshasana?
Vrikshasana (वृक्षासन), commonly known as Tree Pose, is a standing balancing asana performed on one leg. The other leg is bent, with the foot placed against the inner side of the standing leg according to the practitioner’s ability.
The Sanskrit name comes from vṛkṣa, meaning “tree,” and āsana, meaning “posture” or “seat.” The name reflects the basic character of the pose: the standing leg provides a grounded foundation while the spine and arms extend upward.
Unlike a posture in which the body is supported equally by both feet, Vrikshasana asks you to organize the whole body around a single supporting leg. The foot and ankle make continual adjustments, while the hips, spine, gaze and breath contribute to maintaining stability.
What Makes Vrikshasana a Balancing Pose?
The challenge of Vrikshasana is not simply to stand on one foot. It is to find stability without unnecessary tension.
Even when the posture appears still, the body is making small adjustments to maintain equilibrium. A beginner may sway, step out and begin again many times. With patient practice, these adjustments can become smaller and more controlled.
Wobbling does not necessarily mean that the posture is being done incorrectly. Rather than fighting every movement, notice what is happening and make a calm adjustment.
The practice is therefore less about achieving a perfectly motionless shape and more about learning to remain aware while maintaining a steady foundation.
Vrikshasana in Traditional Yoga
Vrikshasana has an interesting place in the history of Yoga because a posture bearing this name appears in a classical Haṭha Yoga text.
Vrikshasana in the Gheranda Samhita
The Gheraṇḍa Saṃhitā, a traditional Haṭha Yoga text, describes Vṛkṣāsana in its second chapter. The instruction describes standing on one leg while placing the other foot at the root of the opposite thigh, with the body likened to a tree.
This is an important historical reference, but it is worth being precise about what it tells us.
The text establishes that a posture called Vṛkṣāsana was described in a traditional Yoga manual. It does not mean that every detail of the modern Tree Pose taught today must have remained unchanged from that period.
Yoga asana has developed through different teachers, texts and schools. Names have also sometimes been used for different forms. Therefore, it is better to acknowledge the classical reference without making an unsupported claim that the modern classroom version is identical to the historical posture in every respect.
Classical Vrikshasana and the Modern Tree Pose
The resemblance is clear: both involve standing on one leg with the other foot positioned against the standing leg.
Modern instruction commonly adds elements such as different foot-placement options, specific arm positions, drishti, wall support and beginner modifications. These reflect the way asana is taught in contemporary Yoga.
This distinction matters. Respecting the traditional roots of Yoga does not require us to give every modern form an invented ancient history.
A Yogic Reflection on the Tree
The tree offers a useful image for understanding the practice.
A tree needs roots before it can rise. In the same way, the student first establishes the standing foot before trying to extend the arms or deepen the posture.
The trunk grows upward without abandoning its foundation. Vrikshasana similarly asks us to create length while remaining grounded.
A tree also moves with its surroundings. It does not need to become rigid to remain standing. In Vrikshasana, small movements are part of maintaining balance.
This gives us a simple principle for practice:
Be rooted, but do not become rigid.
The physical posture can therefore become an opportunity to observe steadiness, effort, attention and self-awareness.
How to Do Vrikshasana
Practise Vrikshasana on a firm, non-slip surface. If you are learning the pose, keep a wall or another stable support nearby.
Starting Position
- Stand upright in Tadasana with the feet comfortably grounded.
- Let the arms rest naturally beside the body.
- Take a few calm breaths and bring your attention to the contact of both feet with the floor.
- Choose a steady point in front of you for your gaze.
Do not rush into the one-legged position. First establish the quality of standing.
Establish the Standing Leg
- Shift your weight gradually onto one foot.
- Feel the standing foot making contact with the floor.
- Keep the standing leg active and the knee naturally extended, without forcefully hyperextending or locking it.
- Allow the body to organize itself over the standing foot rather than leaning to one side.
If you already feel unstable here, there is no need to continue. The standing foot is the foundation of the posture.
Place the Other Foot
- Bend the opposite knee and bring the lifted foot toward the standing leg.
- Place the foot at a suitable position—such as the ankle, calf or inner thigh—according to your ability.
- For beginners, place the lifted foot above or below the knee rather than directly against the joint.
If the foot slips, lower it. A lower position practiced steadily is more useful than a higher position maintained through strain.
Bring the Hands Into Position
- Begin with the palms together at the chest if you are still finding your balance.
- Once stable, you may raise the arms overhead.
- Keep the shoulders relaxed rather than lifting them toward the ears.
The arms do not need to be raised immediately. Establish the root before extending the branches.
Find Your Drishti
- Keep the gaze on one steady point in front of you.
- Let the gaze remain relaxed rather than staring forcefully.
A steady gaze can help gather attention, but it should not create tension in the eyes or face.
Breathe and Hold
- Continue breathing smoothly and naturally.
- Keep the spine lengthened and the standing leg active.
- Remain in the posture only as long as you can maintain reasonable steadiness and comfortable breathing.
How to Come Out of Vrikshasana
- Lower the arms if they are raised.
- Release the lifted foot gently.
- Return to Tadasana and allow both feet to reconnect with the floor.
- Notice the difference between the two sides before repeating on the other leg.
Move out of the posture with the same awareness with which you entered it.
Where Should You Place Your Foot in Vrikshasana?
The lifted foot does not have to reach the highest position for the posture to be useful.
Foot on the Inner Thigh
Placing the foot against the inner thigh is the commonly shown full version of Tree Pose. When your hip mobility allows it comfortably, placing the foot here can give you a secure and steady base for the posture.
Do not force the knee outward simply to imitate the appearance of the pose.
Foot on the Calf
The calf can be a useful alternative when the inner-thigh position is not comfortable or accessible.
The important point is that the foot should make stable contact without pressing directly into the knee joint.
Toes on the Floor for Beginners
You can also keep the toes of the lifted leg lightly touching the floor while the heel rests near the ankle.
This reduces the balance demand while allowing you to practise the actions of the posture.
It is not a failed Tree Pose. It is a sensible way of learning.
Never Press the Foot Against the Knee
Avoid placing the sole directly against the side of the knee joint.
If you cannot comfortably reach the calf or inner thigh, simply choose a lower position or keep the toes on the floor.
The highest foot position is not the goal. A stable and comfortable practice is.
How to Find Your Balance in Vrikshasana
Balance improves when you stop treating it as something that must be forced.
Root Through the Standing Foot
Feel the standing foot connecting with the floor. Avoid collapsing onto the inner or outer edge of the foot.
Think of the foot as the root of the posture.
Keep the Standing Leg Active
The standing leg provides the support for everything above it. Keep it active without creating unnecessary hardness.
If the knee is aggressively locked or pushed backward, the posture can become tense rather than stable. The awareness of a grounded, active standing leg can also be explored in standing postures such as Virabhadrasana.
Keep the Pelvis Stable
Try not to collapse into the standing hip. Keep the pelvis as level and forward-facing as comfortably possible while allowing the lifted leg to open naturally.
Allow the lifted knee to open outward only as far as the hip comfortably allows, without forcing it or unnecessarily twisting the pelvis.
Lengthen Through the Spine
Once the foundation is stable, imagine the crown of the head moving upward.
The tree grows upward from its roots. In the same way, the upward movement in Vrikshasana should come from a stable base rather than from leaning or straining.
Use a Steady Drishti
A fixed point can help reduce unnecessary movement and gather your attention.
If your gaze wanders, you may notice that your balance changes with it.
Keep the Breath Smooth
Do not hold your breath in an attempt to become more stable.
A smooth breath can help you notice when you are using more effort than necessary.
Allow Small Natural Adjustments
Your foot, ankle and leg will make small movements as you balance. There is no need to eliminate every wobble.
Instead, observe it and make calm adjustments without losing your foundation.
Steadiness is not the absence of movement; it is the ability to respond to movement without losing the foundation.
Vrikshasana for Beginners
If you are new to balancing postures, make the pose easier before trying to make it deeper.
Use a Wall for Support
Stand close enough to a wall that you can touch it when needed. Use the wall as a support, not something to lean your whole body against.
Try the Kickstand Variation
Let the lifted foot stay lightly grounded through the toes, with the heel positioned close to the ankle of the supporting leg. This gives you a gentler way to explore the shift of weight onto one leg while keeping some contact with the floor.
Keep the Hands at the Chest
There is no need to raise the arms immediately. Hands at the chest allow you to focus on the standing leg and foot first.
Start With a Short Hold
A short, steady hold is more valuable than remaining in the pose while the breath becomes strained or the body begins compensating.
Progress Only When the Base Is Stable
A simple progression is:
support → stable standing leg → higher foot placement → longer hold → arms overhead
Move forward gradually. Yoga practice is not a competition to reach the final shape as quickly as possible.
Common Mistakes in Vrikshasana
Pressing the Foot Into the Knee
Why it happens: The practitioner is trying to place the foot as high as possible.
Correction: Move the foot to the calf or inner thigh, or use the toes-down variation. Never force the foot against the knee.
Collapsing Into the Standing Hip
Why it happens: The standing leg is not providing enough active support.
Correction: Re-establish the standing foot and keep the standing leg active while lengthening upward through the spine.
Locking the Standing Knee
Why it happens: The student tries to make the leg rigid for stability.
Correction: Keep the standing leg active without forcing the knee backward or hyperextending it.
Gripping the Toes
Why it happens: The foot tries to hold onto the floor as balance becomes difficult.
Correction: Spread and ground the foot while allowing unnecessary tension in the toes to soften.
Turning the Pelvis Excessively
Why it happens: The lifted leg opens outward and the rest of the body follows it.
Correction: Allow the lifted knee to open only as far as the hip comfortably allows, without unnecessarily twisting the pelvis.
Looking Around
Why it happens: The gaze moves away from the chosen point, making it harder to maintain focused attention.
Correction: Return to a steady drishti and keep the gaze relaxed.
Holding the Breath
Why it happens: The practitioner is concentrating too forcefully or trying too hard to remain balanced.
Correction: Reduce unnecessary effort and allow smooth, natural breathing to return.
Raising the Arms Too Early
Why it happens: The student tries to complete the full shape of Tree Pose before establishing the foundation.
Correction: Keep the hands at the chest until the standing leg and balance feel reasonably stable.
Forcing the Foot Higher
Why it happens: Comparing your posture with a photograph or another practitioner.
Correction: Use the foot position you can maintain with stability and awareness. A higher foot is not automatically a better pose.
Treating Wobbling as Failure
Why it happens: Expecting balance to mean absolute stillness.
Correction: Notice the movement, make calm adjustments, and continue breathing. Small movements are a natural part of balancing.
Benefits of Vrikshasana
Vrikshasana offers benefits that are both practical and connected with the qualities cultivated through Yoga practice.
Improves Balance and Stability
Standing on one leg challenges the body’s ability to maintain equilibrium. The foot, ankle, leg and trunk continually make adjustments to keep the body organized over its base.
Regular practice can therefore develop familiarity with one-legged balance and stability, while research on Vrikshasana has also examined the biomechanical demands of maintaining the posture.
Strengthens the Standing Leg
The standing leg carries the body’s weight and remains active throughout the posture. The muscles around the foot, ankle, calf, knee and hip contribute to maintaining the position.
Develops Body Awareness
Vrikshasana gives immediate feedback. A small shift in weight, a change in gaze or unnecessary tension can affect the posture.
This makes it a useful practice for observing how different parts of the body work together.
Supports Hip Mobility
The lifted leg moves outward while the standing leg remains grounded. Depending on the individual and the chosen foot position, the posture can provide an opportunity to explore comfortable movement around the hip. For another approach to hip mobility, see Gomukhasana.
Mobility should never be forced simply to make the knee appear farther outward.
Encourages Concentration
Maintaining a one-legged posture while keeping the gaze steady requires sustained attention.
The practice can therefore be approached as an opportunity to gather the mind rather than simply as a physical balance exercise.
Supports Upright Postural Awareness
Vrikshasana encourages the practitioner to maintain an upright spine while standing on one leg. The combination of grounding below and lengthening above develops awareness of how the body organizes itself around a smaller base. This awareness of standing alignment can also be explored through other standing postures, including Trikonasana.
The Yogic Benefit: Practising Steadiness
Perhaps the deeper value of Vrikshasana is the opportunity to practise steadiness.
You may wobble. You may lose the posture. You may find one side easier than the other.
The practice is to notice these experiences without immediately reacting with frustration or force.
In this sense, Vrikshasana can become a simple lesson in awareness, steadiness and self-observation.
Modern research can help us understand balance and physical function, but those findings should not be confused with proof that Vrikshasana itself treats or prevents a particular disease.
What Muscles Does Vrikshasana Work?
Vrikshasana involves more than the muscles of the lifted leg.
The standing leg does much of the stabilizing work. The muscles of the foot and ankle respond to small shifts in balance, while the calf and quadriceps help support the body.
The gluteal and other hip-stabilizing muscles help maintain the position of the pelvis. The muscles of the trunk also contribute to keeping the body upright as the base becomes narrower.
The lifted leg is active too, but its role is different: it is positioned and stabilized rather than carrying the body’s full weight.
The exact muscular demand varies with foot placement, arm position, stance, individual anatomy and how the posture is performed.
How Long Should You Hold Vrikshasana?
There is no single holding time that is appropriate for every student.
A beginner may start with a short hold and gradually increase the duration as balance and breathing become more comfortable. Some institutional Yoga protocols use specific time ranges, but these should not be treated as universal rules for every practitioner.
A useful guideline is simple:
Stay only while you can maintain reasonable steadiness, comfortable breathing and an appropriate form.
Practise both sides. If one side is less stable, that does not mean it should be forced to match the other immediately.
In Vrikshasana, the quality of attention matters more than collecting seconds.
Precautions and Contraindications of Vrikshasana
Vrikshasana is a balancing posture, so choose a level of practice appropriate to your ability.
When to Modify or Use Support
Use a wall, chair or another stable support if you are not confident standing on one leg.
There is no benefit in repeatedly falling simply because you are unwilling to use support.
Knee, Ankle and Hip Concerns
If you have an existing injury or significant discomfort involving the knee, ankle or hip, modify the posture or seek appropriate professional guidance before practising.
Never force the lifted leg into an uncomfortable position.
Vertigo, Dizziness or Significant Balance Problems
If you experience vertigo, significant dizziness or difficulty maintaining balance, avoid practising Vrikshasana without appropriate guidance. Use a stable support when appropriate, and stop if balancing makes you feel unwell.
When to Avoid Forcing the Pose
Pain is not a requirement for progress.
If you experience sharp, sudden or unfamiliar pain, come out of the posture rather than trying to hold through it. Yoga safety research
Pregnancy, Recent Surgery and Individual Medical Conditions
If you are pregnant, recovering from surgery, or managing a significant medical condition, you may need to modify balancing postures according to your individual circumstances.
When in doubt, practise under the guidance of an appropriately qualified Yoga teacher or healthcare professional who understands your circumstances.
The purpose of a precaution is not to create fear around Yoga. It is to encourage intelligent practice.
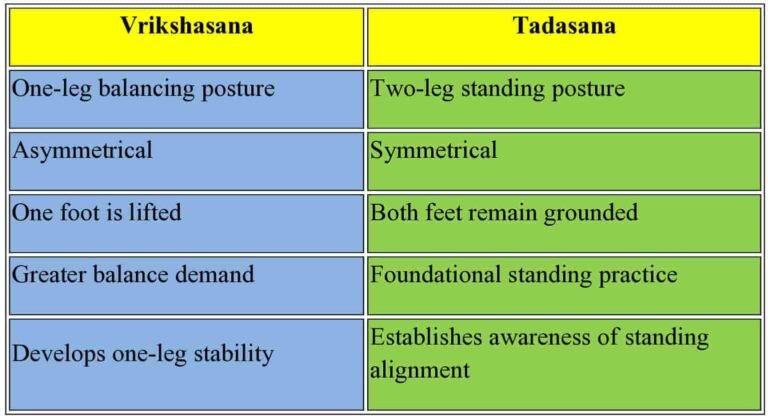
Vrikshasana vs Tadasana
Tadasana can be a useful preparation for Vrikshasana because it teaches the student to recognize grounded standing before introducing the additional challenge of balancing on one leg.
Vrikshasana vs Natarajasana
Both Vrikshasana and Natarajasana are standing balance postures, but their demands are different.
Vrikshasana generally keeps the lifted leg bent with the foot supported against the standing leg. Natarajasana involves holding the lifted foot behind the body and extending the leg while the trunk moves into a deeper shape.
As a result, Natarajasana usually introduces greater demands on balance, coordination, hip mobility and spinal movement.
For a student developing basic one-legged stability, Vrikshasana can provide a simpler place to begin.
Frequently Asked Questions About Vrikshasana
What does Vrikshasana mean?
Vrikshasana comes from the Sanskrit word vṛkṣa, meaning “tree,” and āsana, meaning “posture” or “seat.” It is commonly translated as Tree Pose.
How do you do Vrikshasana?
Stand in Tadasana, shift your weight onto one leg, and place the other foot against the standing leg at a comfortable position. Bring the hands to the chest or overhead, establish a steady gaze and breathe naturally. Release with control and repeat on the other side.
Can beginners do Vrikshasana?
Yes. Beginners can start with the toes of the lifted foot touching the floor, use a wall for support, or place the foot lower on the standing leg. The full foot-to-inner-thigh position is not necessary at the beginning.
Where should the foot be placed in Vrikshasana?
The lifted foot can be placed at the ankle, calf or inner thigh according to your ability and comfort. Keep the lifted foot either below or above the knee rather than resting it directly on the knee.
Can the foot rest on the calf?
Yes. The calf can be used as an alternative to the inner thigh when it feels comfortable and stable. If it creates discomfort or pressure, use a lower variation with the toes touching the floor.
Why should the foot not press against the knee?
For beginners, it is better to place the lifted foot above or below the knee rather than directly against the joint. If the foot cannot comfortably reach the calf or thigh, choose a lower variation instead.
Why do I keep losing balance in Vrikshasana?
Balance can be affected by the standing foot, leg stability, pelvic position, gaze, breath and unnecessary tension. Start with support, keep the gaze steady and use a simpler foot position. A little movement is natural while your body learns to find and maintain its centre.
How long should I hold Vrikshasana?
Begin with a duration that allows you to maintain comfortable breathing and reasonable stability. Gradually increase the hold as your practice develops rather than following an arbitrary number.
Does Vrikshasana improve concentration?
Vrikshasana requires sustained attention because you must maintain balance while keeping the gaze steady and the breath smooth. This makes it a useful posture for practising focused awareness.
What muscles does Vrikshasana work?
It primarily challenges the muscles involved in standing-leg and foot-and-ankle stability, along with the calves, quadriceps, hip stabilizers and trunk muscles. The exact demand varies with how the posture is performed.
What are the precautions for Vrikshasana?
Avoid forcing the posture or practising through pain. Use support if balance is difficult, and seek appropriate guidance if you have an injury, significant balance difficulty, are recovering from surgery, or have a condition requiring an individualized approach.
Final Thoughts
Vrikshasana may look like a simple act of standing on one leg, but the practice invites a deeper observation.
First, find the root. Then allow the body to rise.
The standing foot gives stability, the spine creates length, the gaze gathers attention, and the breath reminds us not to become rigid in our effort.
Some days the posture will feel steady. On other days, the body may sway from the very beginning. Both experiences can become part of practice.
The aim is not to conquer balance or create a perfect shape. It is to learn how to remain rooted, aware and responsive while the body finds its own steadiness.
That is the quiet lesson of the tree.
Disclaimer
The information in this article is intended for general educational purposes and is not a substitute for individualized medical or professional advice. Yoga should be practised within your own comfortable range and with appropriate modifications when needed. If you have an injury, persistent pain, a medical condition, are recovering from surgery, or are pregnant, seek appropriate professional guidance before practising poses that may need modification.
About the Author
Yogacharya Dhruv Ji is a yoga teacher and practitioner committed to preserving and sharing the authentic wisdom of traditional Yoga and Kriya Yoga. He received his training in Yoga and Kriya Yoga under the guidance of Swami Birajananda Giri Maharaj, a respected spiritual teacher known for his teachings on yogic philosophy, meditation, and the traditional practices of self-realization.