
Gomukhasana (Cow Face Pose): A Practical Guide for Better Mobility
What Is Gomukhasana?
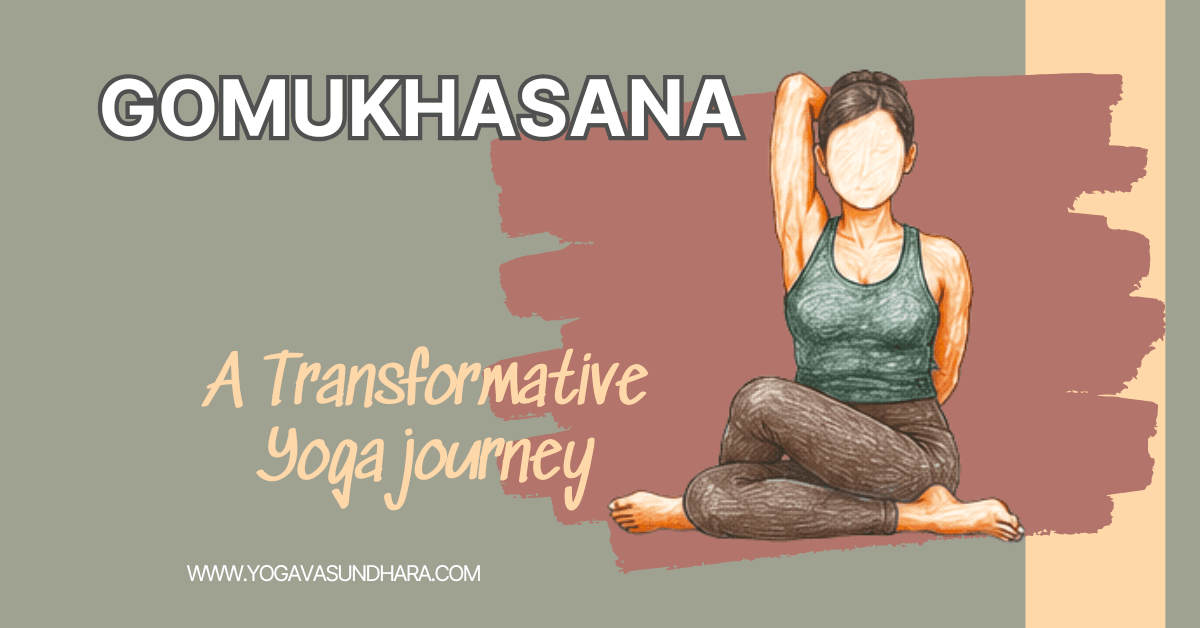
Gomukhasana is a seated yoga posture in which the legs are folded across one another while the arms are arranged in opposite directions around the shoulders. The position brings the hips, shoulders, and upper body into a single posture and can be adjusted according to a practitioner’s mobility.
The pose is commonly called Cow Face Pose in English. Its name refers to the shape associated with the completed posture, particularly the arrangement of the legs and arms.
Gomukhasana Meaning
The Sanskrit name Gomukhasana is formed from:
Go — cow
Mukha — face or mouth
Asana — posture or seated position
The name can therefore be understood as “Cow Face Pose.” The traditional explanation relates the arrangement of the body in the posture to the features of a cow’s face.
What Is Gomukhasana Called in English?
The established English name for Gomukhasana is Cow Face Pose. You may also encounter descriptions such as Cow Face Yoga Pose or Gomukh Pose, although “Cow Face Pose” is the clearest and most widely used English name.
Gomukhasana in the Classical Yoga Tradition
Gomukhasana appears in classical Hatha yoga literature, including the Hatha Yoga Pradipika and the Gheranda Samhita. In the Hatha Yoga Pradipika, the posture is described through the arrangement of the ankles and legs and is identified by its resemblance to a cow.
The classical descriptions are notably brief. They focus on the placement of the legs rather than giving the detailed overhead-and-behind-the-back arm instructions commonly taught in modern classes. The Gheranda Samhita likewise describes a seated leg arrangement for Gomukhasana.
This is an important distinction when learning the pose today: the classical description and the modern form are not necessarily identical. The familiar arm position is widely used in contemporary practice, but it should not automatically be presented as part of the original classical description.
Practising Gomukhasana: A Step-by-Step Guide
Step 1: Set Up Your Seat
Begin seated with your legs stretched forward. Lengthen through the crown of your head without stiffening your back. If your pelvis tends to roll backward, place a folded blanket beneath your sitting bones. If your shoulders or hips feel stiff, spend a few moments with gentle mobility movements before setting up the pose.
Step 2: Fold One Leg In
Bend your left leg and bring the heel toward the outside of your right hip. Let the left knee point forward rather than pushing it toward the floor.
Step 3: Arrange the Legs Together
Bend the right leg and bring it across the left. Allow the knees to come toward each other and place the right foot beside the outside of the left hip. If the knees do not align closely, stay with the position your hips can comfortably manage rather than forcing them together.
Step 4: Bring One Arm Overhead
Lift the right arm beside your ear. Bend the elbow and let the forearm travel down behind your head toward the upper back.
Step 5: Reach Up From Behind
Take the left arm around the back of your waist and bend the elbow, allowing the hand to move upward behind you. Keep the shoulder comfortable and avoid pulling the arm higher simply to bring the hands closer.
Step 6: Choose a Comfortable Hand Position
If the fingers meet without strain, hold them lightly. If there is a gap between the hands, place a strap or folded towel between them. The aim is to work within your available shoulder movement, not to force a bind.
Step 7: Establish the Final Position
Sit upright with your weight balanced between the sitting bones. Keep the shoulders relaxed and avoid pushing the ribs forward to make the arms look deeper. Let the breath remain smooth and unforced.
Step 8: Breathe and Remain at Ease
Remain in the posture only while the stretch feels manageable. You may notice the strongest sensations around the shoulders, upper arms, outer hips, or thighs, depending on your mobility.
Step 9: Come Out and Repeat
Release the arms gently before unfolding the legs. Sit comfortably for a moment, then set up the opposite side by changing the top leg and arm.
How to Practise Gomukhasana with Better Alignment
- Keep both sitting bones as evenly grounded as comfortable rather than leaning to one side.
- Let the knees move toward one another without forcing them into a perfect stack.
- Keep the spine long and the chest comfortably open without arching the lower back. Practising Tadasana (Mountain Pose) can also help you develop greater awareness of upright alignment.
- Relax the shoulders and avoid pulling the hands together forcefully.
- Keep the head and neck neutral while looking straight ahead or slightly downward.
- If the hips or shoulders feel restricted, use a folded blanket, block, or strap instead of forcing the position.
How Do You Position the Arms in Gomukhasana?
In the full pose, the arm on the same side as the top leg is commonly brought overhead, while the opposite arm reaches upward from below. When you switch the top leg, switch the arm positions as well so that both sides receive a balanced practice.
A simple rule to remember: the arm on the same side as the top leg is the upper arm.
Which Muscles Are Involved in Gomukhasana?
Gomukhasana places different demands on the body through its arm and leg positions.
The shoulders, upper arms, chest, and upper back are involved in creating and maintaining the arm position. The glutes, outer hips, hip rotators, and thighs are affected by the crossed-leg position. Muscles around the trunk also help maintain an upright seated posture while you remain in the pose.
The exact sensation and intensity can vary considerably depending on individual flexibility, hip mobility, and shoulder range of motion.
What Does Gomukhasana Stretch?
Gomukhasana can create stretching sensations in the shoulders, upper arms, outer hips, glutes, and thighs, depending on how the posture is performed and the individual’s mobility.
The arm arrangement places the shoulders and upper arms into a demanding range, while the crossed-leg position works into the outer hips and surrounding tissues. The intensity can differ substantially from one side to the other.
With regular, comfortable practice, Gomukhasana may support flexibility and mobility in the shoulders and hips. Props such as a folded blanket or yoga strap can make the posture more accessible without requiring a deeper position.
What Are the Benefits of Gomukhasana?
Gomukhasana may support flexibility and mobility in the shoulders, hips, and surrounding muscles when practised comfortably. Government of India guidance on Gomukhasana also describes the posture in relation to flexibility and shoulder and back stiffness.
May Improve Shoulder Flexibility
The arm position challenges shoulder mobility and may gradually support a greater comfortable range of movement.
May Increase Hip Flexibility
The crossed-leg position places a stretch through the outer hips and surrounding muscles.
May Stretch the Thighs and Glutes
The leg arrangement can create noticeable stretching around the outer hips, glutes, and thighs.
May Encourage an Upright Sitting Position
Maintaining the pose with an elongated spine can encourage awareness of seated alignment.
May Help Relieve Feelings of Muscular Tightness
Gentle, sustained stretching may help reduce the sensation of tightness in areas involved in the posture.
Encourages Body Awareness
Holding the posture while observing alignment, breathing, and physical sensations can develop greater awareness of how the body feels.
May Promote Relaxation When Practised Mindfully
Slow breathing and a steady, comfortable practice may contribute to a more relaxed experience.
Can Be Adapted for Different Levels of Flexibility
A strap, blanket, block, or modified leg position can make the posture more accessible while maintaining its basic movement pattern.
Common Mistakes to Watch for in Gomukhasana
Pushing the Knees into Position
Trying to make the knees stack perfectly can place unnecessary pressure on the hips or knees. Let the legs settle only as far as your mobility allows.
Pulling the Hands Together
If your fingers do not meet behind your back, do not tug on the arms to close the gap. Use a strap or towel and keep the shoulders relaxed.
Leaning to One Side
The crossed legs can make it tempting to shift your weight onto one hip. Try to distribute your weight evenly rather than forcing both knees toward the floor.
Losing a Natural Spine
Avoid collapsing the chest or rounding excessively just to reach a deeper position. Keep the torso comfortably upright.
Tensing the Neck and Shoulders
The upper body should not become rigid while you work on the arm position. Keep the jaw, neck, and shoulders as relaxed as possible.
Holding the Breath
A deeper stretch is not a reason to stop breathing. Maintain a smooth, comfortable breath throughout the hold.
Ignoring a Difference Between Sides
One side may feel considerably easier than the other. Practise both sides without forcing the tighter side to match the more mobile one.
How Long Can You Stay in Gomukhasana?
There is no fixed holding time that suits everyone. Beginners can start with a few comfortable breaths and gradually stay longer as the position becomes familiar.
A practical starting point is around 30–60 seconds on each side, provided you can maintain relaxed breathing and a comfortable position. You do not need to remain in the pose longer simply to make the practice more effective.
Come out sooner if you notice sharp pain, increasing joint discomfort, numbness, tingling, or strained breathing. The quality of the position matters more than reaching a particular time.
Ways to Progress Your Gomukhasana Practice
Improvement in Gomukhasana usually comes from gradually developing the mobility needed for the posture rather than trying to make the final shape deeper each time.
Work on the shoulders separately: Practise gentle shoulder movements and stretches that prepare the arms for the behind-the-back position.
Give the hips regular attention: Include comfortable hip-mobility work in your wider yoga practice rather than relying on Gomukhasana alone.
Use support when needed: A strap can bridge the distance between the hands, while a blanket or block can make the seated position more manageable.
Practise both sides: Notice which shoulder and hip feel more restricted and work patiently on the less mobile side.
Progress gradually: Reduce the support or increase the comfortable range only when the current position feels controlled and pain-free.
Prioritise ease over depth: A smaller, steady movement performed consistently is more useful than forcing yourself into the full shape.
Precautions and Contraindications
Gomukhasana involves significant movement at the knees, hips, and shoulders. If you have an existing injury, persistent joint pain, or limited mobility, the full position may need to be modified or avoided.
Situations That May Call for an Adjustment
Knee problems: Do not force the knees into a stacked position. Use a simpler leg arrangement or practise the arms separately if the knees feel uncomfortable.
Shoulder problems: Avoid forcing the hands together behind the back. Use a strap or practise the arm position separately if the shoulder feels restricted or painful.
Hip problems: Reduce the depth of the crossed-leg position or sit higher on a folded blanket if the hips feel uncomfortable.
Recent surgery or significant injury: Seek advice from an appropriate healthcare professional before attempting the pose.
Sharp pain, numbness, or tingling: Come out of the posture rather than trying to stretch through these sensations.
Practise Within a Comfortable Range
A strong stretch sensation can occur in Gomukhasana, but pain is not a measure of progress. Keep the breathing steady, avoid forcing the joints, and use props or a simpler variation when necessary. If you have a health condition or injury, discuss appropriate modifications with a healthcare professional or qualified yoga instructor before practising. NCCIH – Yoga: Effectiveness and Safety
Frequently Asked Questions About Gomukhasana
Is Gomukhasana suitable for beginners?
Yes, beginners can explore Gomukhasana with appropriate modifications. You do not need to achieve the full leg or arm position at first. A raised seat, a strap, or practising the arms and legs separately can make the posture more accessible.
Why does Gomukhasana feel difficult?
The posture combines shoulder movement with a demanding hip and leg position at the same time. Limited mobility on either side can make the full position feel challenging. Working on the two components separately can make the practice more manageable.
Should my knees touch in Gomukhasana?
The knees do not need to touch or stack perfectly. Their position depends on the mobility of your hips and legs. Avoid pushing the knees into alignment if doing so creates discomfort.
Why are Gomukhasana and Cow Pose different?
No. Although both poses use the word “cow” in their English names, they are different practices. Gomukhasana is a seated posture involving the hips and shoulders, whereas Cow Pose is the spinal extension performed on the hands and knees in the Cat-Cow movement.
Should I practise Gomukhasana on both sides?
Yes. The position is asymmetrical, so changing the top leg and arm allows you to work with both sides of the body. One side may feel noticeably different from the other, which is normal.
Conclusion
Gomukhasana brings the shoulders, hips, and legs into a coordinated seated position that can challenge mobility and body awareness. You do not need to achieve the full shape to practise it effectively. Work within a comfortable range, use a strap or raised support when needed, and give both sides equal attention. With patient and consistent practice, Gomukhasana can be a useful addition to a balanced yoga routine.
About the AuthorYogacharya Dhruv Ji is a Yoga Teacher and practitioner committed to preserving and sharing the authentic wisdom of traditional Yoga and Kriya Yoga. Dhruv Ji received his training in Yoga and Kriya Yoga under the esteemed guidance of Swami Birajananda Giri Maharaj, a revered spiritual teacher known for his deep understanding of yogic philosophy, meditation, and the ancient practices of self-realization. |
Disclaimer
This article provides general information about Gomukhasana for educational and wellness purposes. It is not medical advice and should not be used to diagnose, treat, or cure a health condition or as a substitute for professional healthcare guidance.
Yoga is a physical practice and may need to be adapted to individual mobility, health, and experience. If you have an injury, medical condition, are recovering from surgery, or are uncertain whether this posture is suitable for you, seek advice from an appropriate healthcare professional or qualified yoga teacher before practising. Stop if you experience pain or other concerning symptoms.