
Trikonasana: Benefits, Steps and Precautions
Trikonasana, commonly known as Triangle Pose, is one of the best-known standing postures in modern Yoga. At first glance, it looks simple: the feet are placed apart, the arms extend, and the torso moves sideways. But when you actually practise it, you discover that the pose asks for much more—stable legs, awareness of the hips, length through the spine, balance and controlled breathing.
So, before we begin, remember one thing:
Trikonasana is not a competition to see how low your hand can go.
If you are practising at home, imagine that your teacher is standing beside your mat. Build the posture step by step. Notice what your body is doing. If something feels wrong, don’t simply try harder—adjust the posture.
The Sanskrit name comes from trikona, meaning triangle, and asana, meaning posture or seat. The standing form commonly taught today is documented in 20th-century Yoga teaching traditions, including T. Krishnamacharya’s Yoga Makaranda (1934). This does not establish a single inventor or mean that the modern form was practised in exactly the same way in ancient Yoga.
In this guide, we will keep the focus practical: how to understand Trikonasana, how to practise it, how to correct yourself and how to make it suitable for your home practice.
Trikonasana at a Glance
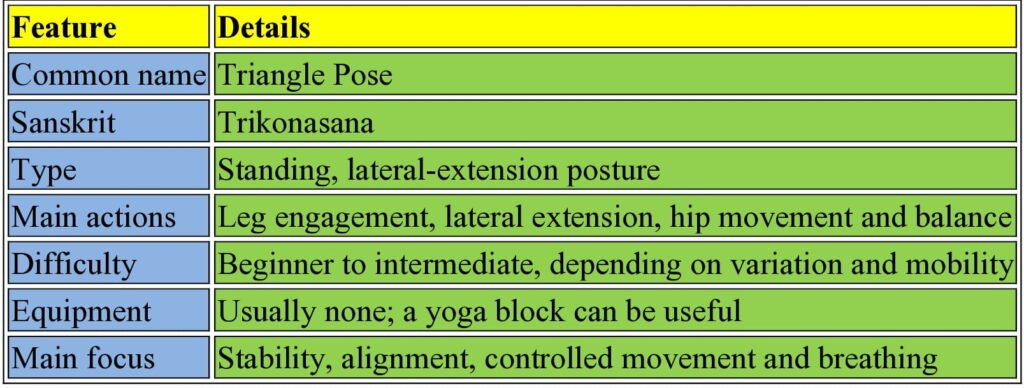
What Is Trikonasana?
Come to a comfortable standing position and imagine the shape we are going to create.
Your feet will be apart. One foot turns outward, the other remains angled slightly inward. Your legs stay active while the torso reaches sideways. One hand comes toward the lower leg or a support, while the opposite arm extends upward.
Don’t make reaching the floor your target.
If the floor is too far away, use your shin, ankle or a block. Stay where you can keep the posture steady and the trunk extended. If moving lower makes the body fold or twist out of position, you’ve gone farther than you need to.
Think of Trikonasana as a coordinated posture rather than a flexibility test.
Trikonasana Benefits
Let us keep the benefits practical. When practised with appropriate control, Trikonasana can help you develop several useful aspects of physical Yoga practice.
- It strengthens and engages the legs
As you establish the stance, both legs become active. The front leg helps support and stabilise the body while the rear leg contributes to the foundation.
Don’t make the mistake of thinking that only the upper body is working. A good Trikonasana begins from the feet.
- It develops awareness of the hips and pelvis
As you move the torso sideways, you become more aware of how the pelvis and hips participate in the movement.
This is one reason I don’t want you to rush into the final shape. First understand where your pelvis is and how your legs are supporting it.
- It gives the body a lateral stretching experience
We spend much of everyday life moving forward, backward and sitting. Trikonasana introduces controlled sideways extension.
Depending on your body and technique, you may feel the movement or stretch through different parts of the legs, hips and side body.
- It challenges balance and coordination
Your feet create a broad foundation, but the movement of the torso still requires coordination.
You will notice that a small change in your feet can change the whole experience of the pose. This is why there is no need to copy another person’s exact stance.
- It develops alignment awareness
Trikonasana teaches you to notice relationships between your feet, legs, pelvis, torso and arms.
With practice, you begin to recognise when the body is organised and when you are simply forcing yourself deeper.
- It develops lateral extension
The sideways reach of Trikonasana gives you an opportunity to explore movement that is often neglected in ordinary daily activities.
- It encourages focused attention
Now notice what happens when you try to keep your feet stable, your breathing comfortable and your movements controlled at the same time.
The posture naturally asks for attention.
What muscles does Trikonasana work?
You will involve muscles of the legs, hips, trunk and shoulders. The exact demand changes according to your stance, body proportions, mobility and technique.
So don’t worry about trying to “activate” one particular muscle. Think of Trikonasana as a whole-body posture in which the legs create the foundation and the torso, hips and arms coordinate with that foundation.
How to Prepare for Trikonasana
Before you begin, look around your practice space.
If you are practising at home, make sure you have enough room to open your legs and extend your arms without hitting furniture, walls or other objects. A non-slip surface is useful. If you have a yoga block, keep it beside your mat.
Now prepare the body gently.
You can use simple standing movements, gentle side bends, comfortable hip and leg movements, or other preparatory Yoga postures appropriate to your practice.
You do not need to spend a long time warming up.
The purpose is simply to arrive on the mat, become aware of your body and prepare for the movement.
And don’t begin when you are in a hurry. Take your time. Give yourself enough room to move into the posture without rushing.
Trikonasana is much easier to learn when you are paying attention rather than trying to finish the steps quickly.
How to Do Trikonasana
Now we practise.
Don’t rush through these steps. If you are following along at home, pause whenever you need to adjust your position.
- Establish your stance
Stand upright.
Take your feet comfortably apart. Don’t immediately make the stance as wide as possible.
Turn your front foot outward. Allow the rear foot to turn slightly inward.
Now stop for a moment.
Do you feel stable?
If not, adjust your feet before doing anything else.
If you feel that your legs are being pulled too far apart, bring them slightly closer. If you feel cramped, give yourself a little more space.
Your stance does not have to look exactly like somebody else’s.
Your first job is not to make the pose look like Trikonasana. Your first job is to create a stable foundation.
- Lengthen the spine
Keep the legs active and grow tall through the crown of the head.
Don’t begin by dropping the torso sideways.
First create length.
Think:
“Tall first, sideways second.”
Avoid aggressively locking the knees. Active legs do not require excessive tension.
If you notice that your knees are becoming rigid, soften the unnecessary tension while keeping the legs engaged.
- Open the arms
Raise both arms approximately parallel to the floor.
Keep the shoulders relaxed.
Don’t let the shoulders creep toward your ears. Keep the arms active without making the upper body unnecessarily stiff.
Take a comfortable breath.
If your arms become tired immediately, don’t fight them. Keep the position manageable and concentrate on the foundation.
- Reach before you hinge
Now begin to reach toward the front leg.
And don’t hurry.
Reach first. Hinge second.
Keep both sides of the waist long as you move; don’t let the lower side collapse toward the leg.
Imagine the side of your body becoming long as you move.
This is different from simply bending downward.
If you immediately drop the lower hand toward the floor, you may lose the length and organisation you just created.
If you feel yourself folding forward instead of extending sideways, stop. Come slightly back up and try again with less depth.
- Bring the lower hand to a suitable support
Continue the movement only as far as you can control.
Your lower hand may come to:
- the shin
- the ankle
- a yoga block
- or the floor, if you can reach it without compromising the posture
If the floor is too far away, take the block.
There is absolutely no need to feel that using a block means you are doing a lesser version of Trikonasana.
Let the hand provide light support rather than carrying your body weight. The support should help you maintain the posture, not help you reach farther than you can comfortably control.
If your hand is reaching the floor but your chest has collapsed toward the leg, bring the hand higher. You have gone lower than your current control allows.
- Extend the upper arm
Now reach the opposite arm upward.
Keep the movement comfortable.
You are looking for a sense of extension rather than trying to pull the arm into a perfect photograph-ready position.
If the upper shoulder starts tightening toward the ear, relax it and keep the arm active without creating unnecessary tension.
- Check yourself
Now imagine that I am standing beside you and asking you to pause.
Look at your feet.
Are they stable?
Look at your legs.
Are they active without unnecessary tension?
Look at your torso.
Have you maintained some length, or have you collapsed toward the floor?
Look at your breathing.
Can you breathe comfortably?
If something has gone wrong, make the pose smaller.
That is a correction, not a failure.
- Choose your gaze comfortably
If looking upward feels comfortable, you may turn your gaze toward the upper hand.
But don’t force the neck simply because you have seen it done that way.
If looking upward creates strain, look forward or downward.
If you notice discomfort in the neck, change the gaze immediately. If the discomfort continues, come out of the posture.
The neck should not become the price you pay for making the pose look complete.
- Breathe and hold
Stay for a short, comfortable period.
Keep breathing naturally.
Don’t hold your breath to maintain the posture.
If you notice that you have stopped breathing, don’t try to “push through.” Reduce the depth, relax unnecessary effort and restore your breathing.
- Come out slowly
Press through your feet and bring the torso upright with control.
Don’t pull yourself up by pushing heavily through the lower hand.
Return to a comfortable standing position.
Take a breath.
Then repeat on the other side.
Notice the transition as well as the final posture. A controlled exit is part of the practice.
How Wide Should Your Stance Be?
You may also be asking how wide the stance should be. Your ideal stance may be different from someone else’s, so adjust your feet according to how stable and comfortable you feel.Choose a position in which you can feel grounded and still move with control.
A wider stance changes the mechanical demands placed on the legs and joints, while a narrower stance may feel easier for some people to control. Research examining different Trikonasana stance widths has demonstrated changes in biomechanical loading, but this does not establish one universally safest stance width for everyone.
So start with a position in which you feel stable.
You should have enough room to extend the torso without feeling that the legs are pulling you apart or that you are about to lose your balance.
If you are wobbling, don’t blame your balance immediately. Check your stance first. Adjust the distance between your feet slightly until you feel stable, then try again.
Your correct stance is the one you can control.
Do You Have to Touch the Floor?
No.
Let me emphasise this because beginners often make this their main goal.
Your hand does not have to touch the floor.
If your hand comfortably reaches the shin, stay there.
If the floor is beyond your comfortable range, place a block beneath the lower hand. The block is there to give you support while you maintain the shape of the posture; it is not a test of how far you can reach
If reaching lower causes the torso to collapse, you have gone farther than your current control allows.
So don’t ask:
“How low can I go?”
Ask:
“Can I maintain the posture here?”
That is a much more useful question.
If the answer is no, come higher.
How Should Trikonasana Feel?
You may notice your legs becoming active as you settle into the posture. There may also be a sense of length through the side of the trunk, hips or legs.
Your right and left sides may not feel identical. One side may feel more open, while the other may require a little more adjustment.
Instead of trying to copy a particular sensation or shape, check what you can control while you are there.
Can you breathe comfortably?
Can you keep your feet firmly connected to the floor?
Can you keep your torso extended without forcing the movement?
Can you stay in the posture without unnecessary strain?
You do not need to create a very strong stretch. The posture should not depend on pushing yourself into the deepest position possible.
If you feel too little
Don’t immediately try to go farther.
Check your foundation first. Make sure your feet are stable and that you are creating length through the torso before moving farther sideways. Sometimes a small adjustment in your setup changes the experience without requiring a deeper position.
If you feel too much
Ease out of the posture slightly.
Bring the lower hand higher on the leg or onto a block, adjust your stance, and reduce the range of movement until you can practise with better control.
If you feel pain
Stop and come out of the posture.
Sharp, pinching or unusual pain, numbness, dizziness, visual changes, significant strain or difficulty breathing are not sensations you should push through.
A difficult posture is one thing; pain or an unusual sensation is another. When that happens, stop and reassess rather than forcing the pose.
Learn to recognise the difference between ordinary muscular effort or a manageable stretch and a signal that your body is asking you to change or stop the movement.
Common Trikonasana Problems and Fixes
When you practise without a teacher beside you, use these quick corrections.
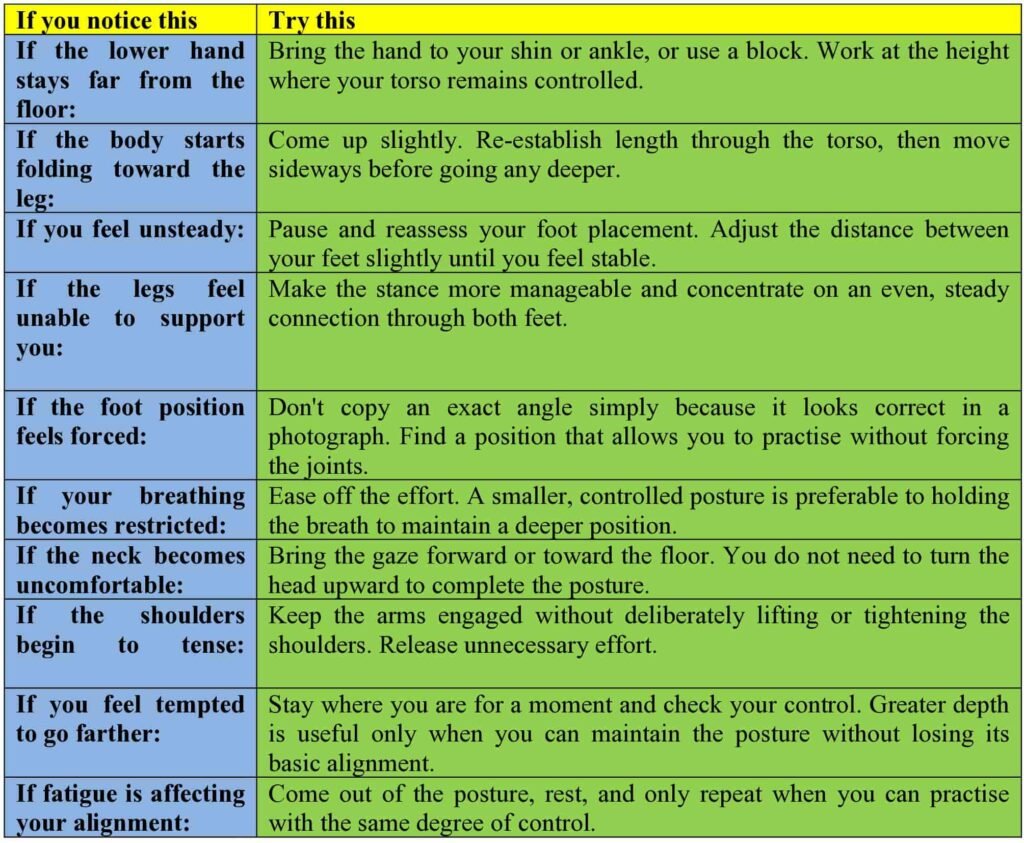
Remember this rule:
When the posture starts falling apart, don’t work harder. First change something.
Trikonasana for Beginners
If this is your first time practising Trikonasana, don’t worry about achieving the full expression immediately.
Let’s build it gradually.
First, learn the stance.
Stand with the feet apart and become comfortable with the front-foot and rear-foot positions.
Next, learn the reach.
Extend the arms and practise moving the torso sideways while keeping the legs stable.
Then add the hinge.
Gradually move toward the front leg.
Use support.
Place the lower hand on a block or higher on the leg.
Only then explore more depth.
If you can maintain stability, comfortable breathing and reasonable alignment, you can gradually work within a larger range.
If you cannot, stay where you are.
You don’t have to graduate to the floor. You graduate when you can control the movement.
This is a much better way to learn at home than trying to reproduce an advanced-looking photograph on your first attempt.
How Long Should You Hold Trikonasana?
You don’t need a heroic holding time.
For a beginner, roughly 15–30 seconds on each side can be a reasonable starting range if you can maintain comfortable breathing and control.
As your practice develops, the duration can be adjusted according to your routine, experience and teacher’s guidance.
But remember:
Longer is not automatically better.
If your alignment deteriorates after ten seconds, staying for thirty seconds does not make the practice more successful.
Come out while you still have control.
How Many Times Should You Practise Trikonasana?
For a short home practice, one controlled round on each side may be enough.
If the posture feels comfortable and forms part of a broader Yoga routine, you can repeat it according to your practice.
Don’t keep repeating the posture simply because you think more repetitions must produce more benefit.
Once fatigue begins to reduce your control, it is time to stop or rest.
A Simple 5-Minute Trikonasana Practice
For a short home practice, try this.
Minute 1 — Prepare
Stand comfortably. Move gently and establish your stance.
Take a few relaxed breaths.
Before beginning, keep your block nearby if you think you may need it.
Minute 2 — Right side
Practise Trikonasana on the right.
Move slowly.
Check your feet first, then your legs, then your torso.
Use a block if necessary.
Minute 3 — Left side
Come out posture slowly and reset your stance and then practise the other side.
Don’t rush simply because you are changing sides.
Minute 4 — Repeat and observe
If you feel comfortable, repeat both sides.
This time pay attention to one thing: perhaps your feet, your breathing or the length of your torso.
Don’t try to correct everything at once.
Minute 5 — Rest
Return to a neutral standing or comfortable resting position.
Notice how you feel.
That’s enough.
A home Yoga practice does not have to be long to be attentive.
Trikonasana Precautions and Contraindications
Now we come to an important part of the practice: knowing when to modify or avoid the posture.
Take particular care or seek appropriate professional guidance if you have:
- a significant neck or cervical-spine problem
- a shoulder injury or condition limiting movement
- a recent surgery or significant injury
- certain eye conditions for which particular head positions may be restricted
- uncontrolled high blood pressure
- certain cardiovascular conditions
- significant balance problems
- another condition that makes standing, bending or weight-bearing uncomfortable
If you are uncertain whether Trikonasana is suitable for you, consult an appropriately qualified healthcare professional and/or Yoga teacher.
During practice, stop if you experience significant pain, dizziness, unusual visual symptoms, numbness or difficulty breathing.
Never use the article as a reason to ignore symptoms that your body is clearly giving you.
Trikonasana and Back Pain
You may come across claims that Trikonasana can cure or treat back pain. Be careful with such claims.
Yoga as a broader practice has been studied in people with chronic nonspecific low-back pain, but that evidence does not establish that Trikonasana itself treats back pain.
If you already have back pain, don’t practise the pose simply because somebody says it is “good for the back.”
Instead, ask a more useful question:
Before you begin, ask yourself: Can I practise this movement comfortably and safely with my present condition and level of experience?
If the posture causes or increases your pain, stop and seek appropriate guidance.
And don’t try to solve discomfort by simply reducing your distance to the floor. Sometimes the correct modification is to change the stance, use support or leave the posture altogether.
Trikonasana vs Parivrtta Trikonasana
You may encounter another posture called Parivrtta Trikonasana, or Revolved Triangle Pose.
The names are similar, but the movements are not identical.
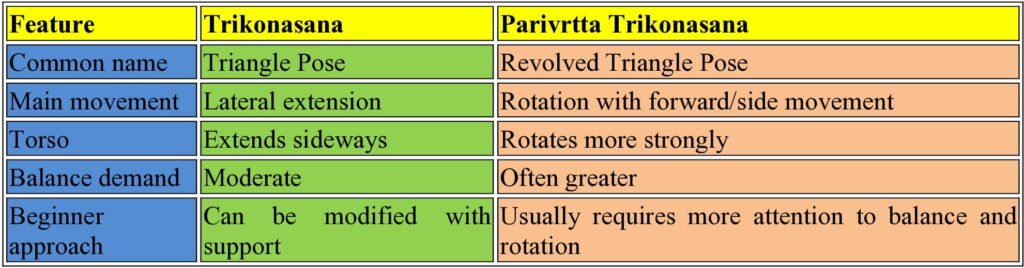
If you are learning basic Trikonasana, don’t assume that the revolved version is simply the same pose with the torso turned.
Learn the movement pattern first.
Different Types and Names of Trikonasana
Trikonasana is commonly translated as Triangle Pose.
You may also encounter Utthita Trikonasana, generally translated as Extended Triangle Pose, in modern Yoga teaching.
Parivrtta Trikonasana refers to Revolved Triangle Pose.
Yoga traditions and teaching systems can use different names for variations, so when learning a posture, pay attention to the actual instructions rather than relying on the name alone.
What Can You Practise After Trikonasana?
After Trikonasana, return to a neutral standing position and notice how the body feels before moving on.
Depending on your overall sequence, you may continue with another standing posture, a gentle forward movement, a balance posture or a comfortable resting position.
There is no single mandatory posture that must follow Trikonasana. Different Yoga traditions use different sequences.
When practising at home, don’t feel that you need to fill every minute with another asana.
Sometimes the best transition is simply:
come out → stand quietly → breathe → observe → continue.
Give yourself a moment to notice whether one side feels different from the other.
A Simple Way to Approach Trikonasana
When you practise Trikonasana, remember these four instructions:
Build the base first.
Don’t begin with the hand. Begin with the feet and legs.
Create length before depth.
Reach through the torso before trying to lower the hand.
Use support intelligently.
A block is not a sign that you are incapable. It can help you practise the movement without forcing your range.
Let the breath tell you how much effort is appropriate.
If you can no longer breathe comfortably, pause and adjust.
And one final instruction:
Don’t try to look like the finished posture. Learn the posture.
Your Trikonasana may look different from somebody else’s. That is normal.
What matters is whether you can enter it with awareness, maintain it with reasonable control and leave it without forcing yourself.
If you are practising at home, keep asking yourself the questions a good teacher would ask:
Am I stable?
Am I breathing?
Am I forcing?
Can I control the movement?
If the answer to one of these is no, don’t be disappointed.
That is the moment to modify your practice.
Final Thoughts
Trikonasana, or Triangle Pose, is a standing Yoga posture that brings together the feet, legs, hips, torso and arms in a coordinated movement.
When you practise it, don’t make touching the floor your destination.
Start with your foundation. Create length through the spine. Reach before you hinge. Use a block when you need one. Keep breathing. Pay attention to your body’s response throughout the practice. If something feels wrong, don’t force your way through it—reduce the range or stop.
This is particularly important when you practise Yoga at home.
You may not have a teacher physically standing beside your mat, but you can still learn to observe your own practice.
Am I stable?
Am I breathing comfortably?
Am I forcing the movement?
Can I enter and leave the posture with control?
Those questions are more valuable than trying to achieve a perfect shape.
With regular, mindful practice, Trikonasana can become more than a posture you know by name. It can become an opportunity to understand your body, improve your awareness of movement and develop steadiness in your Yoga practice.
Disclaimer
This article is provided for general educational purposes and does not replace individual medical advice, diagnosis or treatment. If you have an injury, medical condition, significant pain or uncertainty about whether Trikonasana is appropriate for you, seek guidance from a qualified healthcare professional and/or Yoga teacher.
About the Author
Yogacharya Dhruv Ji is a yoga teacher and practitioner committed to preserving and sharing the authentic wisdom of traditional Yoga and Kriya Yoga. He received his training in Yoga and Kriya Yoga under the guidance of Swami Birajananda Giri Maharaj, a respected spiritual teacher known for his teachings on yogic philosophy, meditation, and the traditional practices of self-realization.